How to send mass email in Gmail (Step-by-step guide)
Learn how to send personalized emails to multiple recipients in bulk, right in Gmail. Use contacts in your Streak pipeline or upload a list of emails directly from a CSV file.
It's that dreaded task again — you need to send out a group email.
For many Gmail users, this looks like manually adding desired recipients one by one to the To field. But did you know there’s a better way?
If you’ve been adding email recipients manually, today’s your lucky day. By making a distribution list in Gmail, you can start organizing your group emails more effectively.
Continue reading as we walk you through each step of the process. We'll also show you how to send personalized mail merges with automated follow-up in Gmail using Streak's Mail Merge feature.
{{cta-box}}
A Gmail distribution list, also known as a Google group, is a single email address with multiple recipients.
When you send an email to a Gmail distribution list, you don't need to type in each recipient's email address separately — all you need to do is use the one distribution list assigned to that one email address, and click Send. Once you do, all of the recipients on that list will receive the email. We’ll show you step-by-step how to create a distribution list in Gmail here shortly.
<div class="anchor-wrapper"><div id="use-distribution-lists" class="anchor-target"></div></div>
For starters, distribution lists save you time and effort. You can say goodbye to manually adding dozens of recipients or copying and pasting email addresses (and making errors in the process). With just one click, your entire distribution list will receive the email.
Distribution lists also come in handy for organizing your contacts. Instead of having to scroll through a long list of names, you can simply add them to a specific distribution list based on their relationship or role in your business.
For example, if you usually send out emails to your sales team, it would make sense to create a dedicated "Sales Team" distribution list so that you can communicate updates, announcements, and other important information easily.
Often people will use distribution lists to:
As a general rule, if you frequently find yourself needing to send emails to the same groups of people, a distribution list is just what you need.
<div class="anchor-wrapper"><div id="create-distribution-list" class="anchor-target"></div></div>
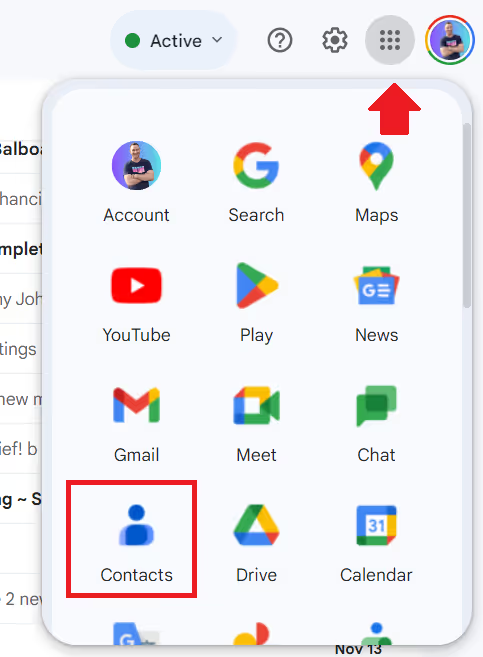
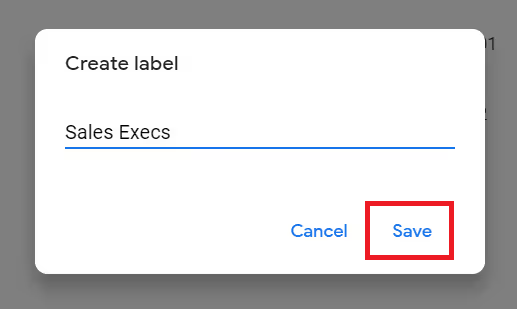
With that said, here's exactly how to go about creating a distribution list in Gmail:


Pro tip: If you have too many contacts and don't want to do this manually, you can select multiple contacts at once by heading over to Contacts, checking the boxes next to each contact you want to add, and then clicking on the Manage Labels button at the top. Then, simply select the new label you created, click Apply, and the contacts will be added to it.
That's it! You have now successfully created a distribution list in Gmail. Feel free to create multiple distribution lists depending on your needs.
<div class="anchor-wrapper"><div id="use-distribution-lists-in-gmail" class="anchor-target"></div></div>
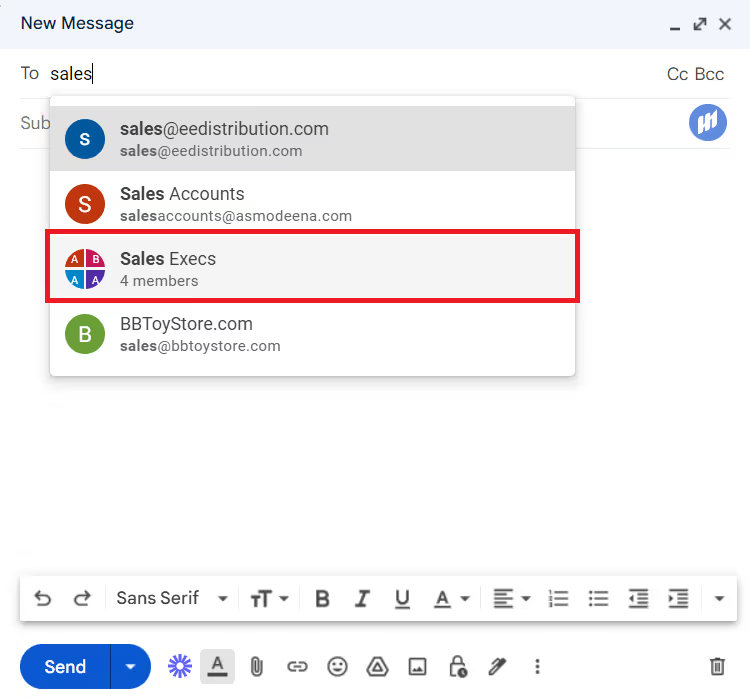
Once your distribution list is created, here's how you can use it within your Gmail account:

Pro tip: You can also add distribution lists to the "CC" and "BCC" fields or send the same email to multiple distribution lists at once by simply adding each label to your desired field.
<div class="anchor-wrapper"><div id="update-gmail-distribution-list" class="anchor-target"></div></div>
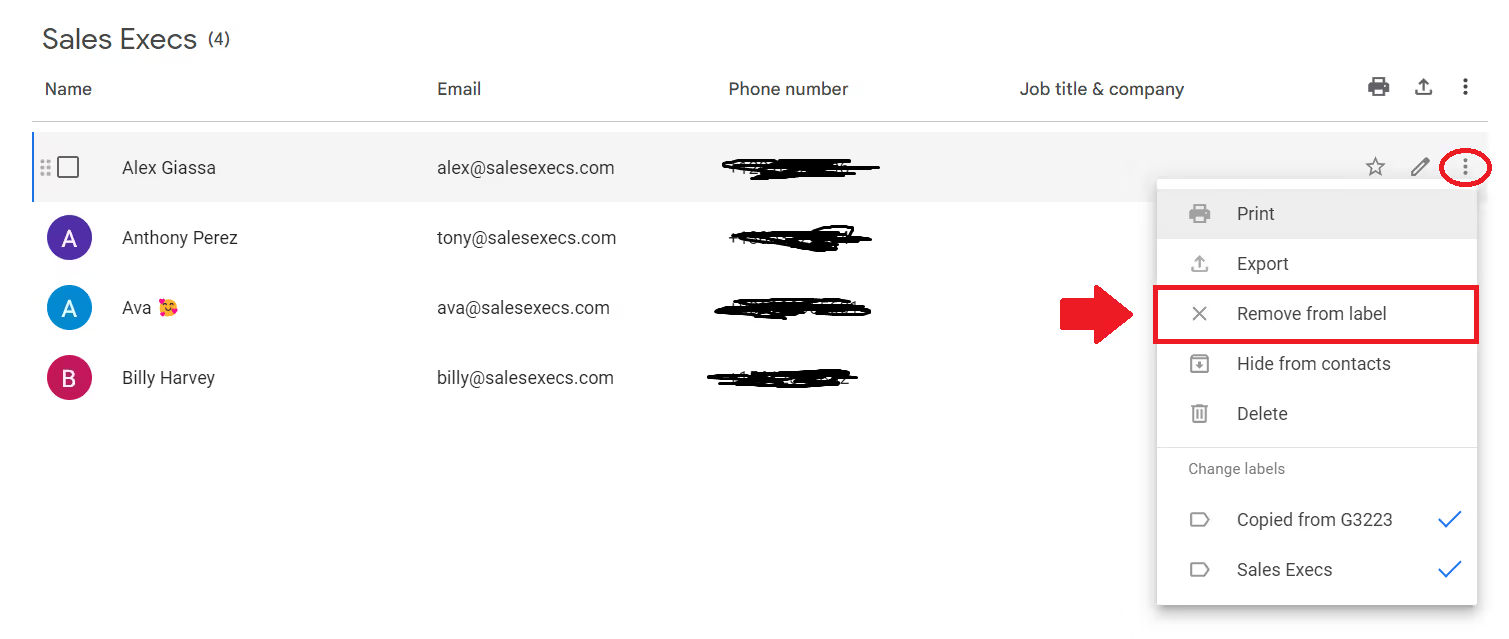
People come and go, and so do contacts in your Gmail distribution lists. It's important to keep these lists up-to-date for efficient communication. Here's how you can update and edit your distribution list:

Pro tip: You can also do this in bulk by checking the boxes next to each contact you want to remove, clicking on the Manage Labels button at the top (denoted by a label icon), unticking the desired label, and clicking Apply.
If you want to add a Google contact to a specific label or distribution list, you can do so by following the same steps you followed when you were creating a distribution list. To recap, in your Google Contacts, you'll head over to Contacts, hover over the contact you want to add, click on the three dots icon, and under Change Labels, select the new label you just created.
You could also do this in bulk. All you need to do is check the boxes next to each contact you want to add, and then click Manage Labels at the top (denoted by a label icon). Then, you'll just need to choose the desired label and click Apply.
Just like that, you've successfully updated your distribution list!
<div class="anchor-wrapper"><div id="tips-and-best-practices" class="anchor-target"></div></div>
Now that you know all about how to create a distribution list in Gmail, here are some additional things to keep in mind to make the most of your group emailing efforts.
<div class="anchor-wrapper"><div id="send-mail-merges" class="anchor-target"></div></div>
You'll win back some time by knowing how to create a distribution list in Gmail, but what if you want to take it a step further and personalize those emails? At Streak, we anticipated this need and created our mail merge feature to streamline this process for you.
With Streak mail merge, you can personalize the same email sent to a large group by inserting custom fields from your pipeline directly into your email templates. This means that instead of sending a generic email to all contacts in a distribution list, each recipient will receive an email tailored specifically to them. And you won’t have to invest any manual time or effort into making it happen.
Not only that, but you can automate follow-up emails as well, saving you even more time and making sure your client communication doesn't fall through the cracks. You also can easily view performance metrics around your mail merges, empowering you to monitor open and click-through rates for every email you send.
In short, with Streak, you can identify the most effective message and focus more of your efforts on what works best going forward.
It’s all free to use within Gmail — all you need to do is install the Streak extension. Try it out today to experience a whole new level of email personalization and efficiency.
<div class="anchor-wrapper"><div id="gmail-distribution-list-faqs" class="anchor-target"></div></div>
To send a group email and hide recipients in Gmail, you can use the BCC (blind carbon copy) feature. This allows you to conceal the email addresses of all recipients from each other.
This will send the email to all members of the Gmail distribution list without revealing their email addresses to each other.
One of the top ways to personalize mass email groups is to use mail merge. This allows you to customize email content for each recipient by leaning on personalized fields to populate details like their name or company.
The Streak CRM extension offers a mail merge feature that integrates directly with Gmail, and it's free. Use it to quickly send out personalized emails to a large group of contacts at once without having to personalize each email manually.

Send personalized mail merges with automatic follow-up or schedule emails to send later with Streak mail merge in Gmail. Send free mail merges daily.